Forms and scripts (V1)
 |
Forms manage the display of work item index data.
Scripts are used to evaluate user interactions for configured forms, modify content in the form, and implement form functions.
You can use the drop-down list to filter for forms and scripts that are part of the workflow. You can also filter by type in each case, i.e. displaying only forms or scripts.
You can change the display using the form parameters and scripts. For more information, see Opening and editing forms and scripts, Creating a form and Creating a script.
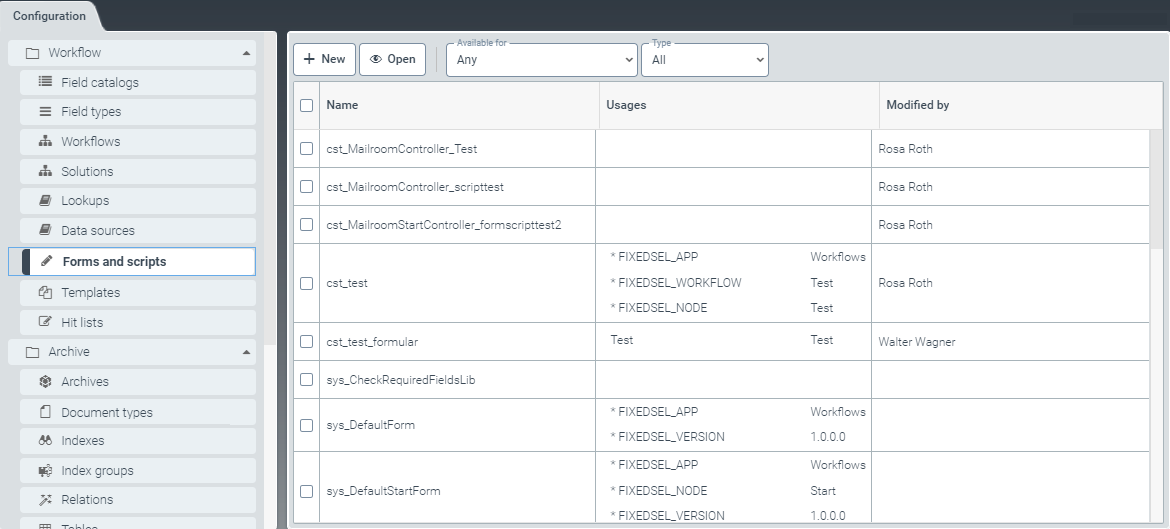
Creating a script
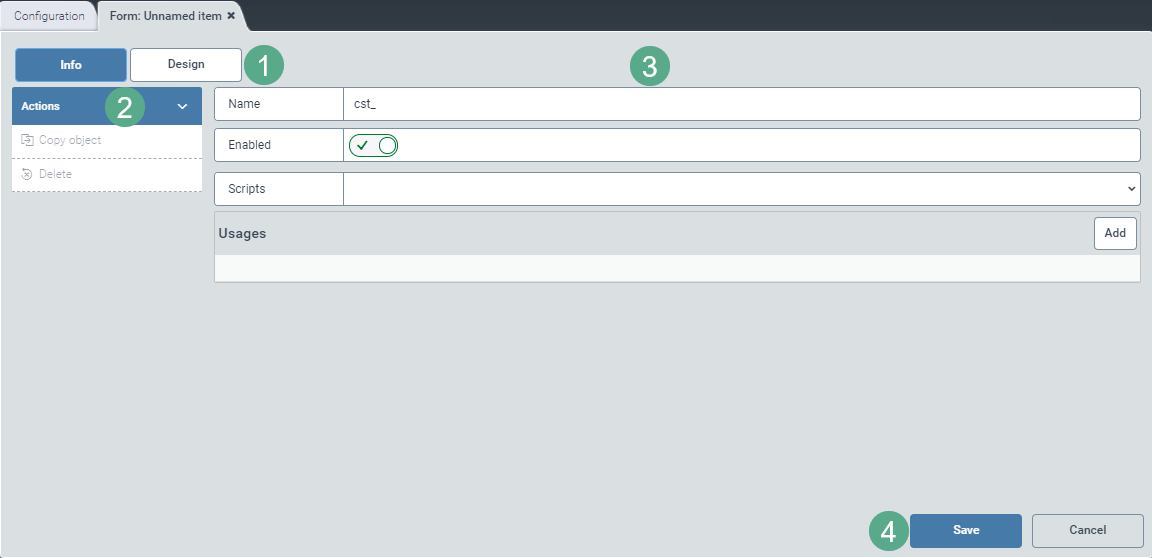
Script option — Info view
From the configuration menu, open the Forms and scripts window and click New.
Select the option Script.
➣ The FormScript: Unnamed item window will open in the Info view (1).
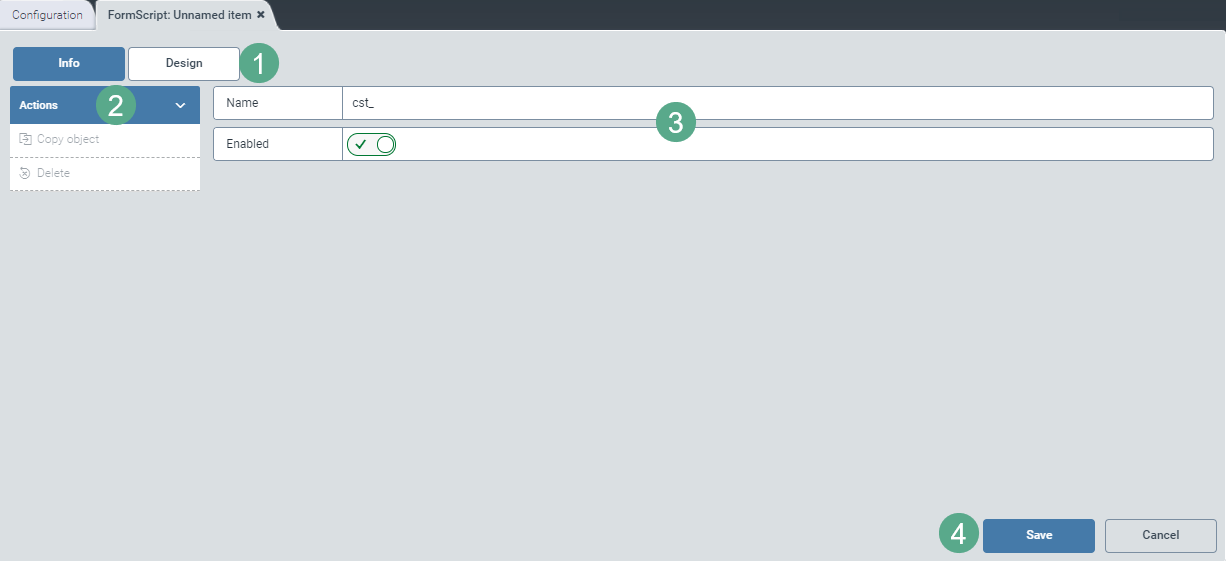
Enter the technical name of the script (3).
Notice
The technical name comes prepended with cst_. This prefix cannot be deleted.
Use the toggle button (3) to enable or disable the script as needed.
Notice
If you have added one or more usages, you can select the option Copy object in the action menu (2).
Click the option Copy object to generate a copy of the form that is currently open. The copy will be identified with the suffix _Copy postpended to the name of the form.
Save the script with the editable parameters or, if necessary, click the button Cancel (4) to discard the draft.
Script option – Design view
Select the Script option.
➣ The FormScript: Unnamed item window will open in the Info view (1).
Click the Design button (1) to toggle between views.
➣ The Design view will open.
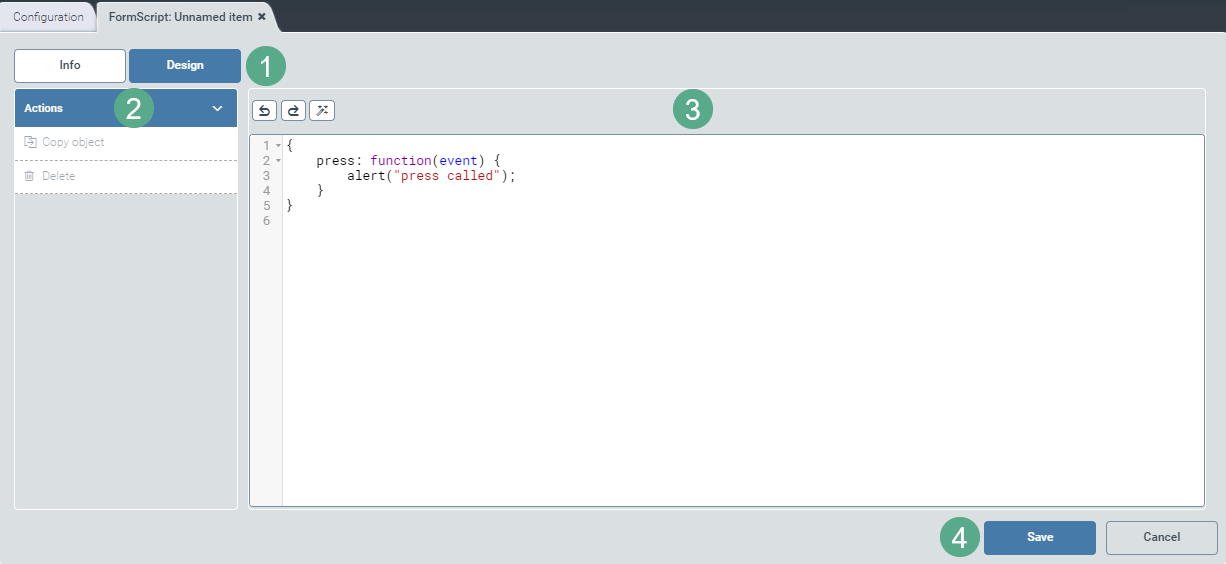
Edit the script directly in the main pane (3) if necessary.
To undo changes, use the
 ; to move one step forward in the editing process, use
  . The
. The  button indents the code according to the layers for better readability (3).
Save the script with the editable parameters or, if necessary, click the Cancel button (4) to discard the draft.
Notice
When a minimum of one usage has been added to forms in the Info view, the the option Copy object will appear in the action menu (2).
Click the option Copy object to create a copy of the script currently open. The copy will be identified with the suffix _Copy postpended to the name of the script.
Creating a form
Form option — Design view
From the configuration menu, open the Forms and scripts window and click New.
Select the option Form.
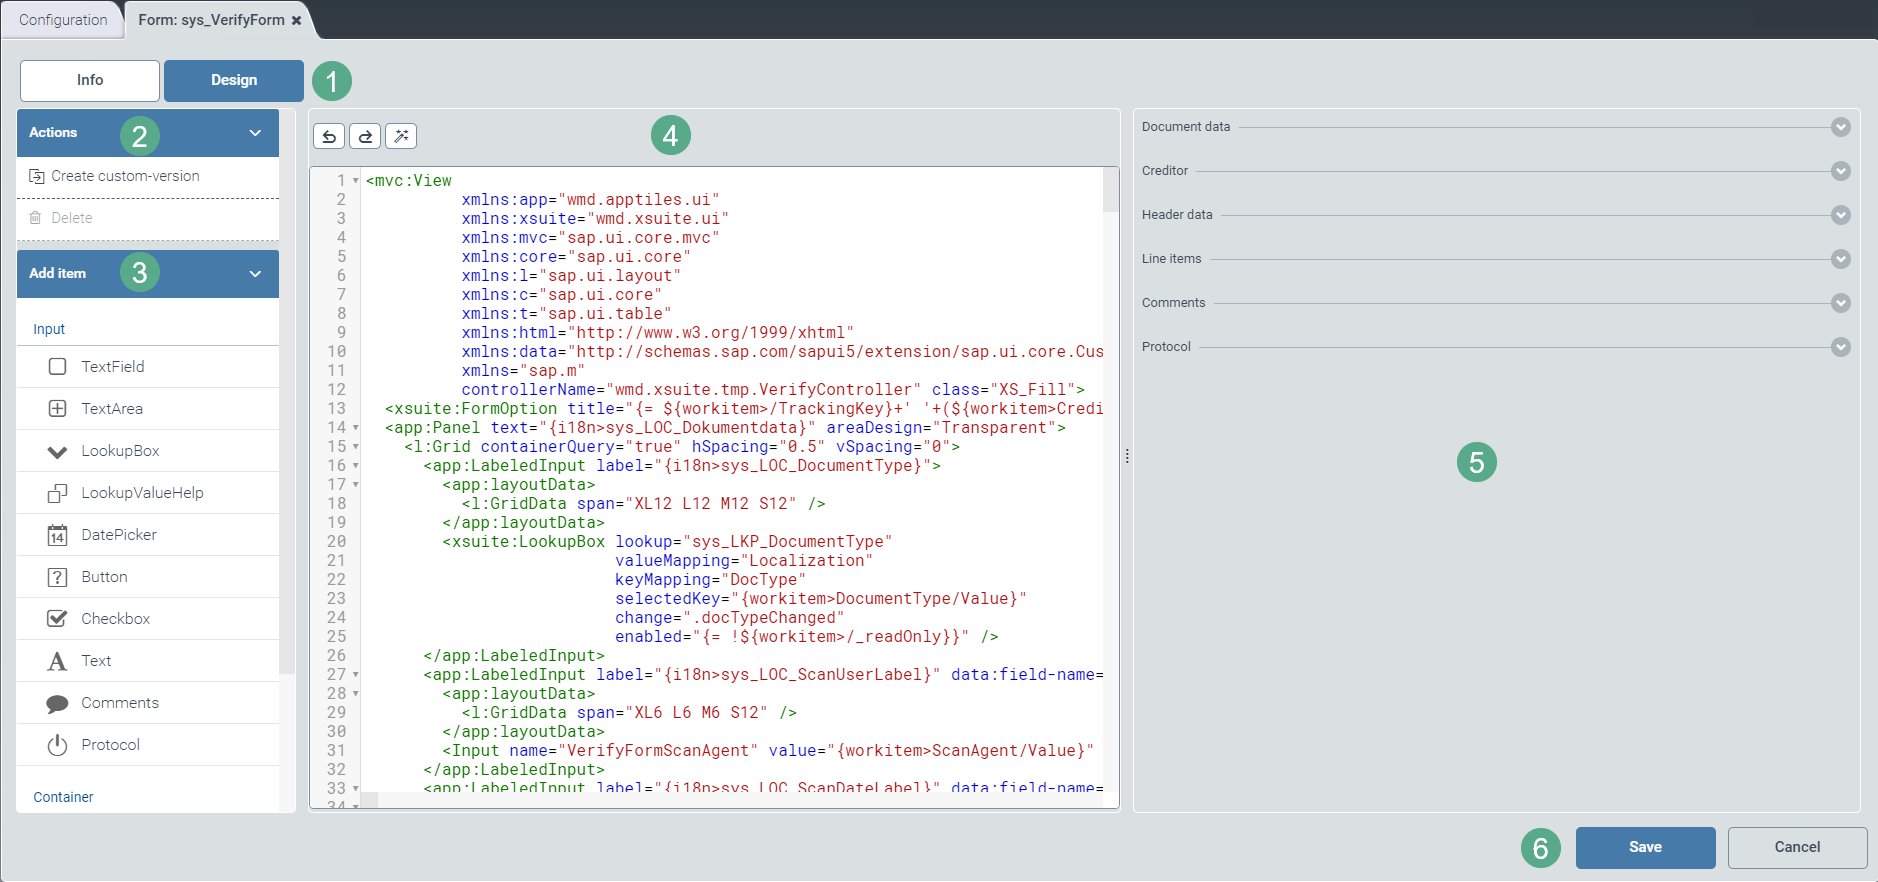
➣ The FormScript: Unnamed item window will open in the Design view (1).
A preview of the form is offered on the right side of the screen (5).
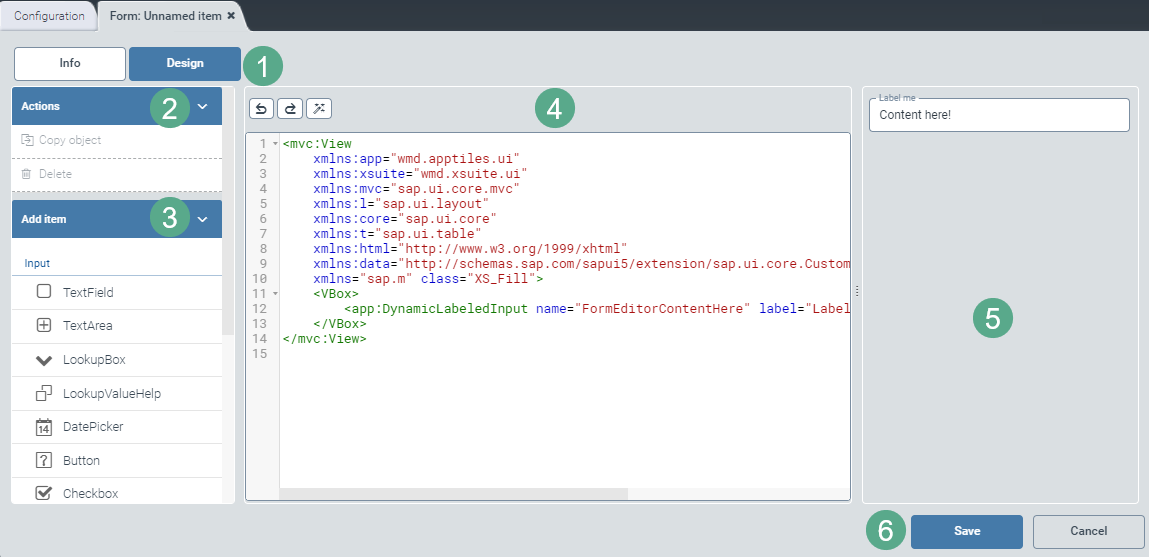
Make any necessary edits directly in the central window (4).
Use the button
to undo changes; use to go one step forward in the editing process. The button indents the code by level for better readability (4).If necessary, drag and drop input or container elements from the Add item menu (3) to the script:
Save the script with the editable parameters or, if necessary, click the Cancel button (4) to discard the draft.
Notice
When a minimum of one usage has been added to forms in the Info view, the the option Copy object will appear in the action menu (2).
Click the option Copy object to generate a copy of the form that is currently open. The copy will be identified with the suffix _Copy postpended to the name of the form.
Form option — Info view
Select the option Form.
➣ The FormScript: Unnamed item window will open in the Design view (1).
Click the Info button (1) to switch the view.
➣ The Info view opens.
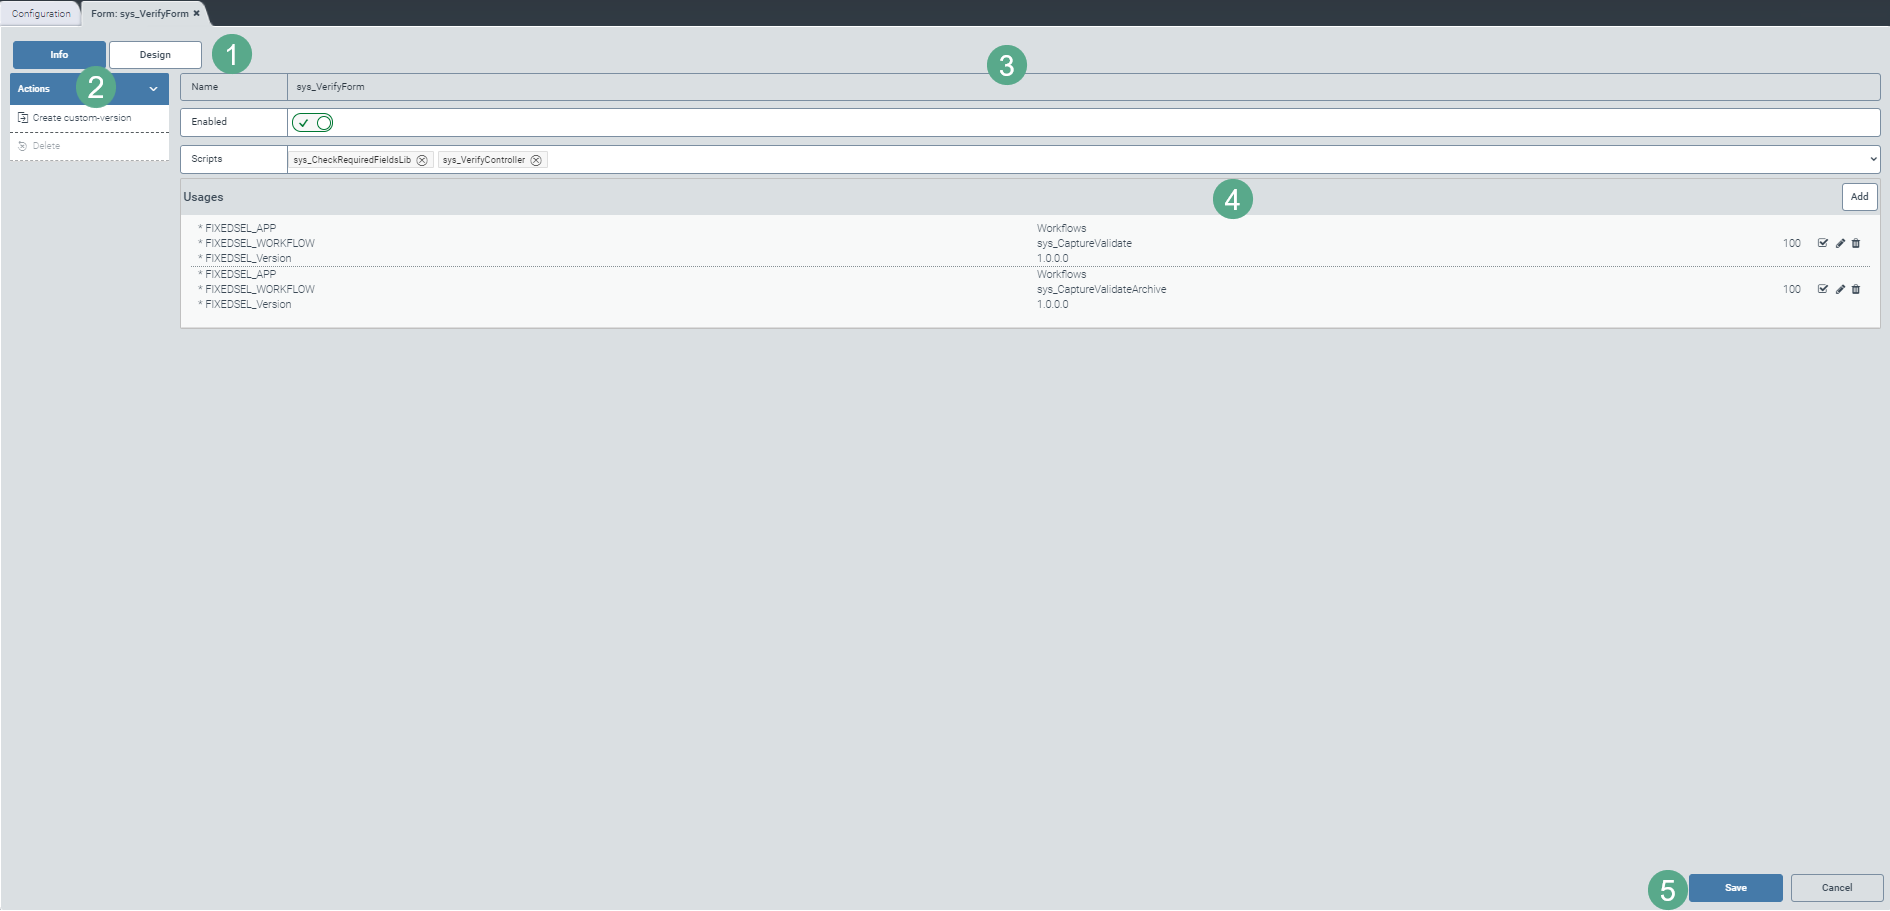
Enter the technical name of the form (3).
Notice
The technical name comes prepended with cst_. This prefix cannot be deleted.
Use the toggle button (3) to enable or disable the form as needed.
Add scripts from the drop-down list (3) as needed.
Notice
If you have added one or more usages, you can select the option Copy object in the action menu (2).
Click the option Copy object to generate a copy of the form that is currently open. The copy will be identified with the suffix _Copy postpended to the name of the form.
Add usages to forms as needed using the Add button.
➣ The Edit usage dialog box will appear.
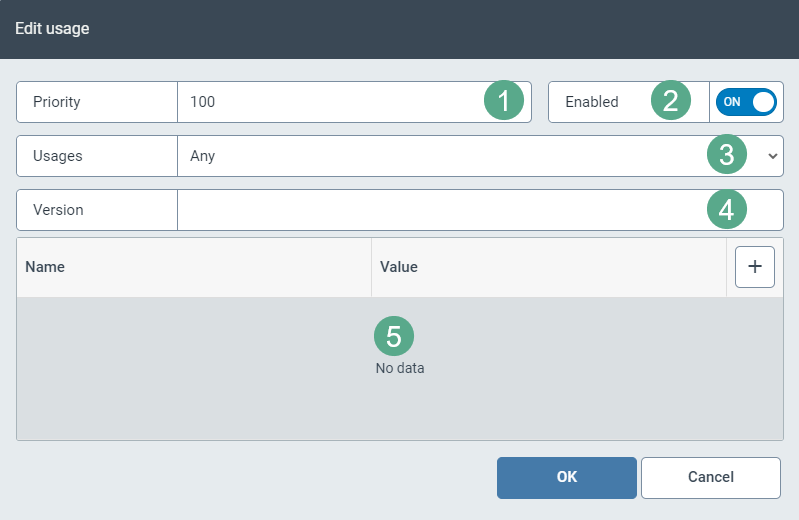
Enter the priority.
The higher the priority, the higher the number entered must be (1).
Use the toggle button (2) to enable or disable the usage as needed.
Select a usage from the dropdown list or from Any (3).
Enter a version number (4).
If you select the option Workflows in Usages, the fields Workflow name and Node name (technical name of the workflow activity) will also appear. Fill out one or both of the fields, depending on what exactly you want to include in the list of usages.
Use the button
 to enter a new row in the table (5). The editable fields Name and Value will appear in the table.
Edit the fields as needed. This will allow you add restrictions to form usage.
Click OK to save the specifications in the dialog box or click Cancel to discard them.
If necessary, edit listed usages by clicking the
 button at the end of the line.
If necessary, delete existing usages by clicking the
 button at the end of the line.
Save the form with the editable parameters or, if necessary, click the button Cancel to discard the draft.
Opening and editing forms and scripts
Design view
In Forms and scripts, select a form by ticking a check box in the line.
Click Open.
➣ The Forms: {Form name} window or the FormScript: {Script name} window will open in the Design view (1).
Notice
The screenshot only shows the editing options for a form in the Design view as an example. For more information on the editing options of a script in the Design view, see Creating a script.
Make any changes to the code for the form/script directly as needed in the edit window (4).
Use the button
to undo changes and the button to move one step forward in the editing process.The button
indents the code by level for better readability (4).If necessary, drag and drop the following input or container elements from the Add item menu (3) to the form:
Input elements
Name
Description
Text Field
One-line text field.
Text Area
Multiline text field.
LookupBox
Drop-down list.
LookupValueHelp
F4 value help.
DatePicker
Date field with integrated calendar selection.
Button
Button to be named individually.
Checkbox
Check box.
The user can click the user interface to activate or deactivate the check box later.
Text
Displayable text.
The user can read the text but not edit it.
Comments
Space for comments.
The button New comment opens a text field in the GUI, allowing the user to enter a comment.
Protocol
Automatic log.
The log records who made what change to the work item, at what time.
The user can track changes made.
Container elements
Name
Description
Panel
Expandable area in an accordion (e.g. the secondary Workflows screen).
Splitter
Element dividing a container into two adjacent areas, separating them from each other by a visual boundary.
Vbox
Layout component arranging subcomponents vertically, allowing the list to continue in downward direction.
HBox
Layout component arranging subcomponents horizontally, continuing to the right.
Check the appearance the form in the preview on the right side of the screen (5).
Save the customized form/script under a new name or save an existing customized form/script under a new version number (6).
Notice
When a minimum of one usage has been added to forms in the Info view, the option Copy object will appear. With scripts, the option will appear as soon as you have opened them.
To copy the form/script currently opened, click Copy object. The copy will be identified with the suffix _Copy postpended to the name of the form/script.
Info view
In the tab Forms and scripts, select a list by clicking on the check box in the respective row.
Click Open.
➣ The Forms: {Form name} window or the FormScript: {Script name} window will open in the Design view (1).
Click the Info button (1) to switch the view.
➣ The Info view will open.
Notice
The screenshot only shows the editing options for a form in the Info view as an example. For more information on the editing options for scripts in the Info view, see Creating a script.
Notice
When editing the forms and scripts, it is recommended that you edit the sys_ version. This will overwrite the standard version.
Use the toggle button (3) to enable or disable the form/script as needed.
Add scripts to forms as needed from the drop-down list; or delete existing scripts by clicking away the individual script entry (3) or removing the check mark for the entry in the drop-down list.
Add usages to forms as needed using the Add button, or delete existing usageswith a click on the
button at the right end of the respective row (4).A usage indicates where the form will be used later.
If you select the option Workflows in Usages, the fields Workflow name and Node name (technical name of the workflow activity) will also appear. Fill out one or both of the fields, depending on what exactly you want to include in the list of usages.
Edit listed usages by clicking the
button at the end of the respective row (4).Save the form/script with the editable parameters under a new name, or click Cancel (5) to discard all the changes as needed.
Notice
When a minimum of one usage has been added to forms in the Info view, the the option Copy object will appear. For scripts, the option will appear as soon as you have opened them.
Click the option Copy object to create a copy of the form/script currently opened. The copy will be identified with the suffix _Copy postpended to the name of the form/script.