Indexes
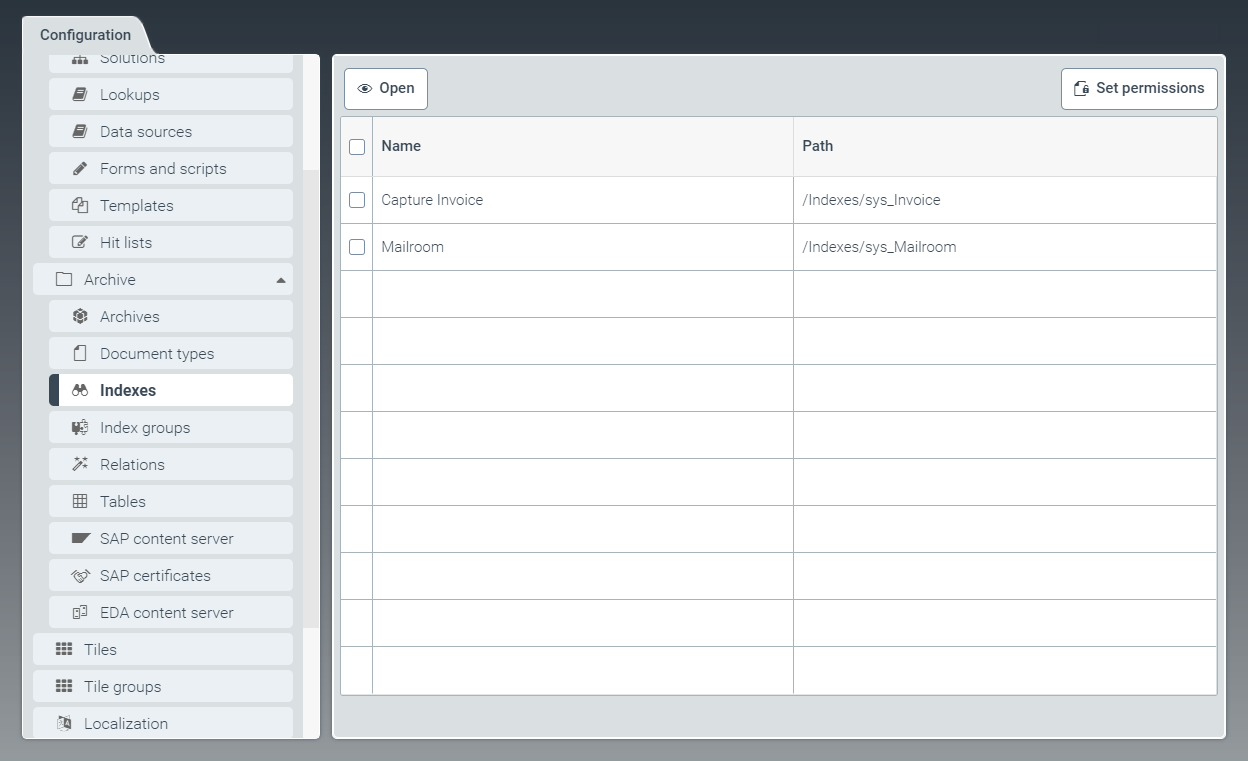 |
In the tab Indexes, you can view and edit indexes of archives. Search filters, hit lists, and query forms for archive indexes can all be defined here.
You can create an archive index when creating an archive in the Archives window (check box Create index for this archive).
Indexes allow searching in full text and fields of archival documents.
Editing a standard index
In the Indexes window, open the standard index (prefix sys_) you wish to use by clicking on the respective row in the table.
➣ The ArchiveIndex: {Index name} window will open.
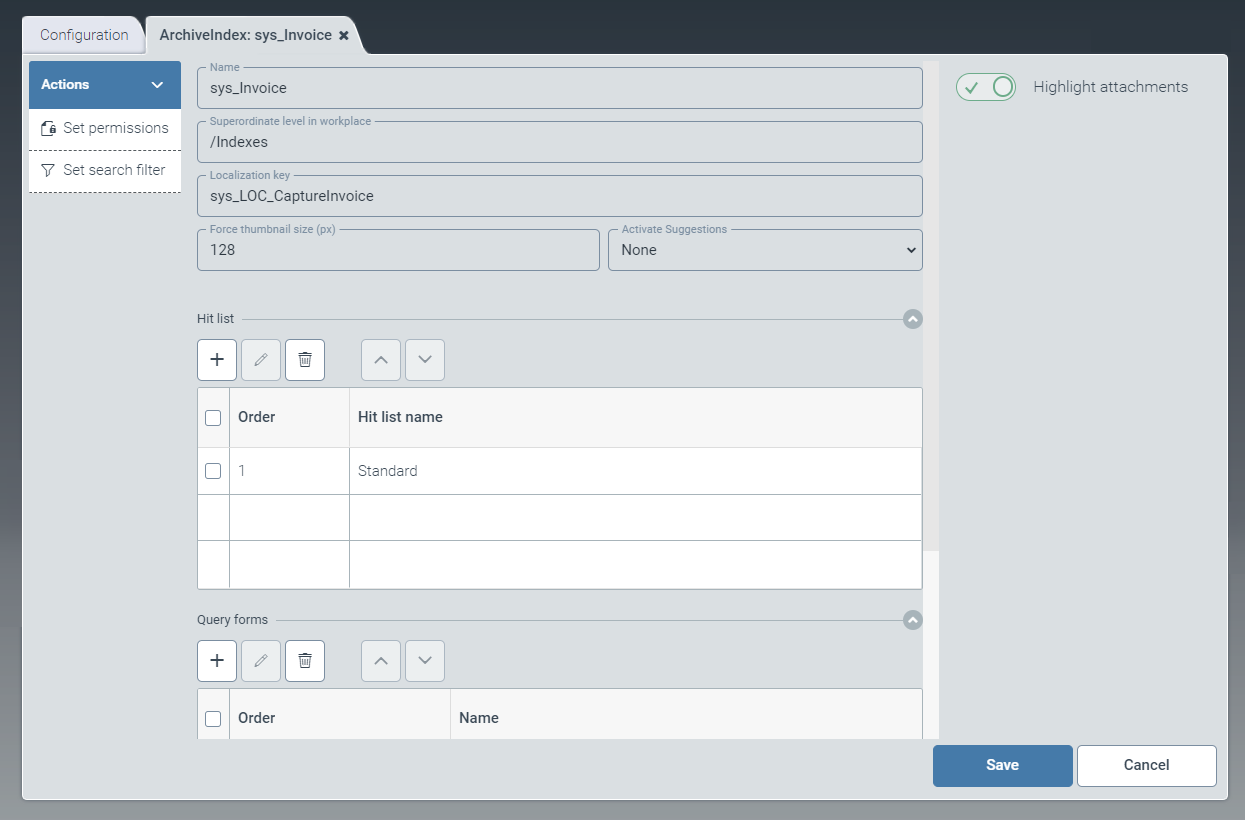
In the Hit list pane, add one or more hit lists.
For more information, see Adding a hit list.
In the Query forms pane, add one or more query forms.
If you do not add a query form, the fields of the hit list will be used for the search form.
For more information, see Adding a query form.
If necessary, activate highlighting of hits in the document attachments, using the toggle button Highlight attachments.
In the action menu, click the option Set permissions and define access permissions.
Select from the following types of authorization:
Authorization
Description
Read
Unrestricted read rights to the index.
Write
Authorization to create and edit archive documents
Delete
Authorization to delete archive documents via the index.
Query
Authorization to search within the index.
Admin
Administration rights to the index.
To set search filters for the index, click the option Set search filter in the action menu.
For more information, see Setting search filters.
Click Save.
Editing a new index
In the Indexes window, open a new index (prefix cst_) by clicking on the respective row in the table.
➣ The ArchiveIndex: {Index name} window will open.
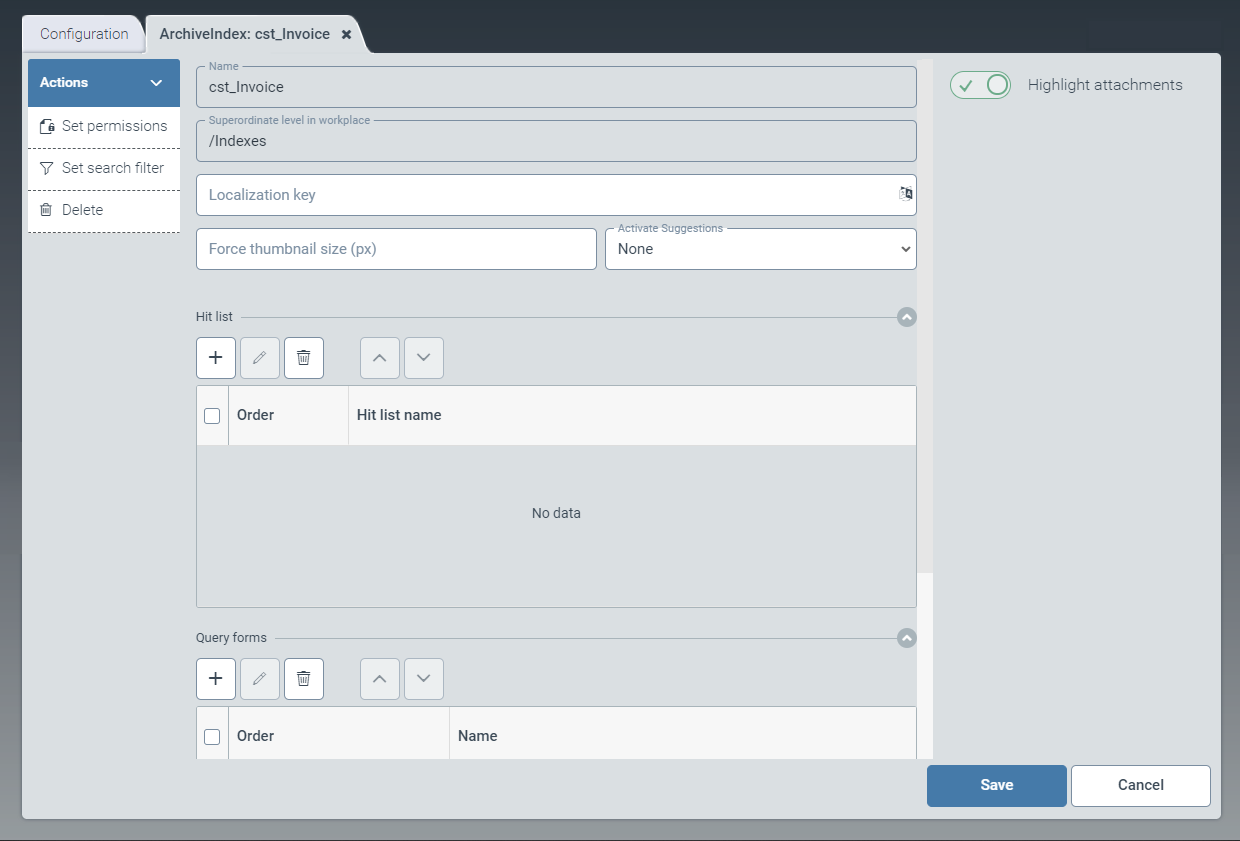
In the field Localization key, alter the index name to be displayed.
In the field Force thumbnail size (px), set the size of the previews, in pixels.
The default value is
128.In the dropdown list Activate Suggestions, select one of the following entries:
None: Lists of suggestions are disabled for this index.All: Lists of proposals are activated for fields of this index that have the data type Suggestion.
In the Hit list pane, add one or more hit lists.
For more information, see Adding a hit list.
In the Query forms pane, add one or more query forms.
If you do not add a query form, the fields of the hit list will be used for the search form.
For more information, see Adding a query form.
If necessary, activate highlighting of hits in the document attachments, using the toggle button Highlight attachments.
In the action menu, click the option Set permissions and define access permissions.
Select from the following types of authorization:
Authorization
Description
Read
Unrestricted read rights to the index.
Write
Authorization to create and edit archive documents
Delete
Authorization to delete archive documents via the index.
Query
Authorization to search within the index.
Admin
Administration rights to the index.
To set search filters for the index, click the option Set search filter in the action menu.
For more information, see Setting search filters.
Click Save.
Notice
To delete an index that has been saved, click Delete.
Adding a hit list
In the Hit list pane, click the button
 Add.
Add.➣ The Edit hit list dialog box will open.
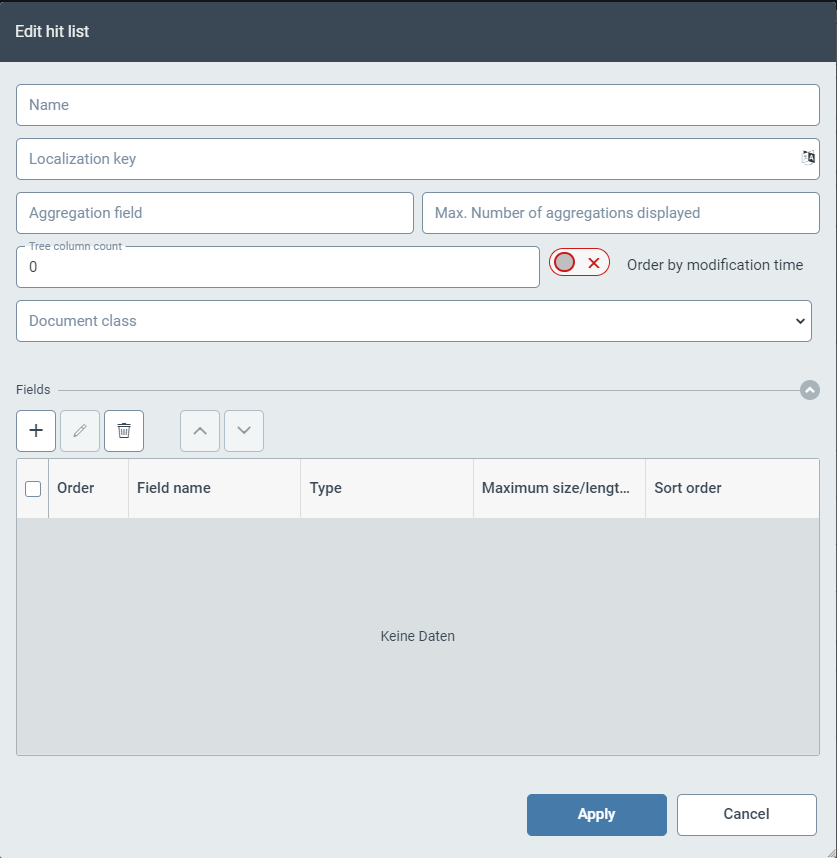
In the Name field, enter the technical name of the hit list.
In the field Localization key, enter the localization key for the hit-list name to be displayed.
To open the Select localization dialog box, click the
 button.
For more information, see Selecting a localization.
In the field Aggregation field, enter the name of the field (
FieldName@DocumentType) to be used for aggregation. In the field Aggregation size, set the maximum size of the aggregation.Notice
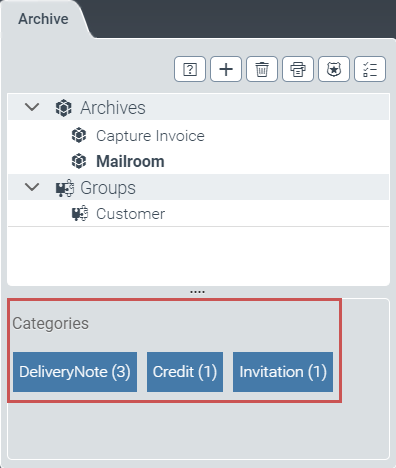
An aggregation shows how many and which documents contain identical field content.
The user can view aggregations in the Categories section of the archive client.
In the field Tree column count, set the number of levels to be displayed for the user in the tree hierarchy of the archive client.
Note
Please note that a maximum of 50 entries are displayed on each level of the tree hierarchy.
If necessary, use the toggle button Order by modification time to activate document sorting according to date of change.
Select the document class for the hitlist.
Add the hit list to the pane Fields.
For more information, see Hit list - Adding a field.
Click Apply.
➤ The hit list will be added.
Hit list - Adding a field
Click the
 button in the Fields pane.
➣ The Edit field dialog box will open.
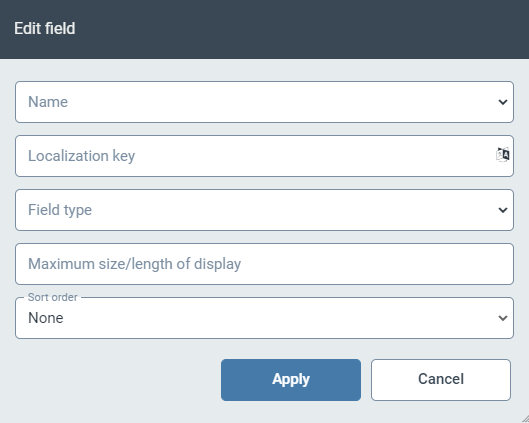
Execute one of the following steps:
In the dropdown list Name, select a field available in the associated document type.
➣ The remaining fields of the dialog box will be filled with the information of the selected field.
In the Name field, enter the technical name of a field to be created.
In the field Localization key, enter the localization key for the field name to be displayed.
To open the Select localization dialog box, click the
button.For more information, see Selecting a localization.
In the dropdown list Field type, select the data type of the field.
Possible values:
NoneThe data type specified in the document type for the field will be used.
StringAny text
BoolCheck box for yes/no selection
IntegerLong integer (64-bit)
DateDate
DecimalNumber with decimal places
LinkLink to another document or attachment
In the field Maximum size/length of display, enter the maximum size of the field in the hit list. The default value is
100characters.In the dropdown list Sort order, select whether the column will be sorted in the hit list, and if so, how.
Click Apply.
➤ The field will be added to the hit list.
Adding a query form
In the Query forms pane, click the button
Add.➣ The Edit query form dialog box will open.
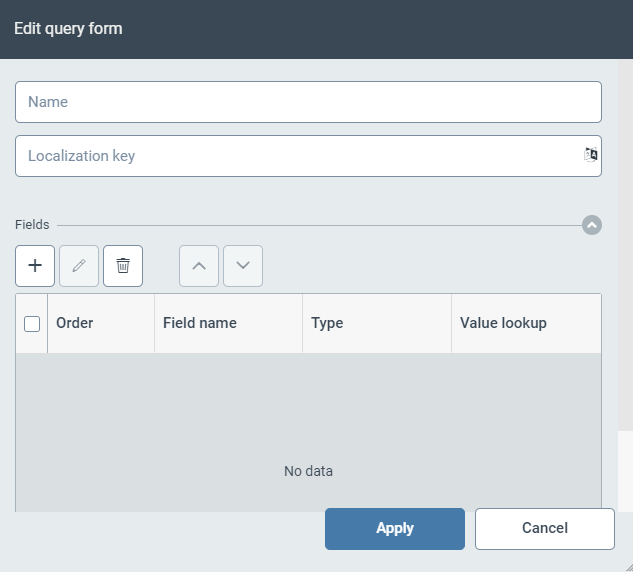
Specify the technical name of the query form in the Name field.
In the field Localization key, enter the localization key for the query-form name to be displayed.
To open the Select localization dialog box, click the
button.For more information, see Selecting a localization.
Add the query form to the Fields fields.
For more information, see Query form - Adding a field.
Click Apply.
➤ The query form will be added.
Query form - Adding a field
Click the
button in the Fields pane.➣ The Edit field dialog box will open.
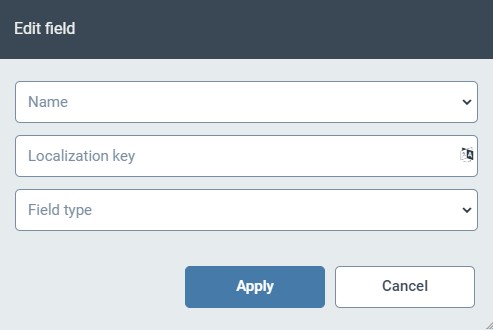
Execute one of the following steps:
In the dropdown list Name, select a field available in the associated document type.
➣ The remaining fields of the dialog box will be filled with the information of the selected field.
In the Name field, enter the technical name of a field to be created.
In the field Localization key, enter the localization key for the field name to be displayed.
To open the Select localization dialog box, click the
button.For more information, see Selecting a localization.
In the dropdown list Field type, select the data type of the field.
Possible values:
NoneThe data type specified in the document type for the field will be used.
StringAny text
Toggle with the button Value lookup as needed to activate display of suggested values for entry in the field.
BoolCheck box for yes/no selection
IntegerLong integer (64-bit)
DateDate
DecimalNumber with decimal places
LinkLink to another document or attachment
Click Apply.
➤ The field will be added to the query form.
Setting search filters
Notice
Search filters applied to indexes only restrict the view for the roles defined.
Search filters do not affect access permissions for archive documents.
In the action menu, click Set search filter.
➣ The Set search filter dialog box will open.
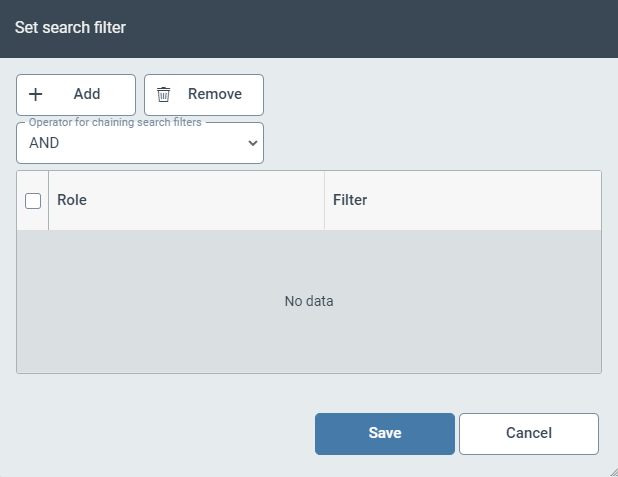
Click Add.
➣ A row will be added to the table.
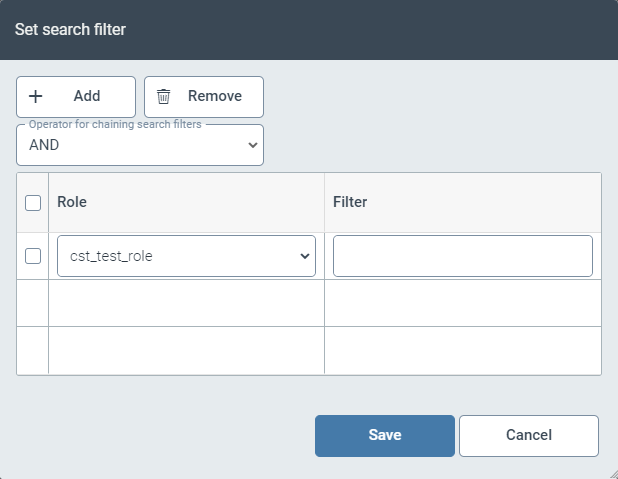
In the column Role, select a user role and go to the column Filter to define the search filter for this user role.
The syntax of the filters corresponds to the syntax of an Elasticsearch query. For more information, see Elasticsearch syntax.
In the dropdown list Operator for chaining search filters, select the operators that are to connect the different search filters.
Possible values:
AND: Connects the individual search filters with an "AND".OR: Connects the individual search filters with an "OR".
Click Save.
➤ The search filters are now set.
Elasticsearch syntax
Category | Syntax | Example |
|---|---|---|
Fulltext | String and Boolean operators |
|
Fields |
Prefix for the data type:
|
|
Field values |
Operators: |
|
Range |
|
|
Date and Time |
|
|