Solutions (V1)
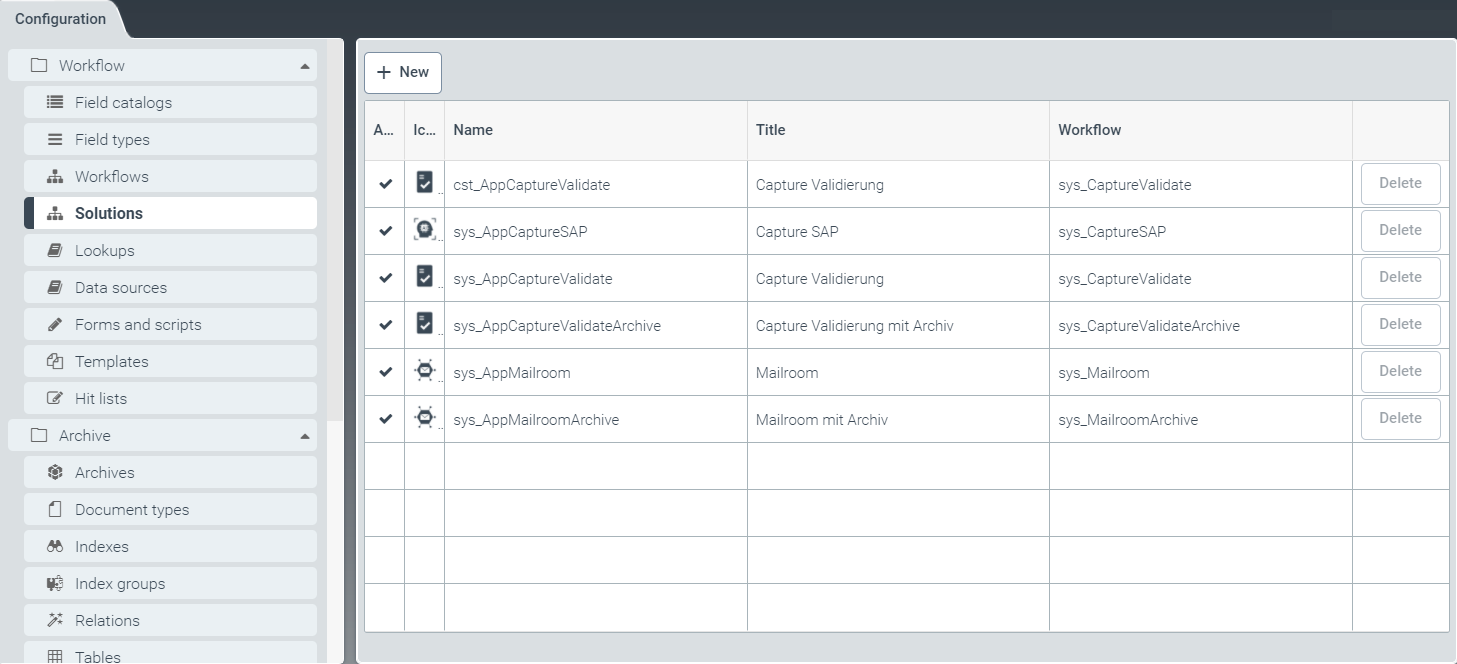 |
Solutions are upstream from workflows, so external systems do not need to be changed when the workflow is modified or updated.
Standard solutions can be enabled or disabled. Standard solutions cannot be modified, but you can create and edit your own solutions based on them. For more information, see Editing a Solution (V1).
You can also create new solutions independent of standard solutions. For more information, see Creating a new solution (V1).
Creating a new solution (V1)
From the configuration menu, open the Solutions window and click New.
➣ The Edit solution dialog box will open.
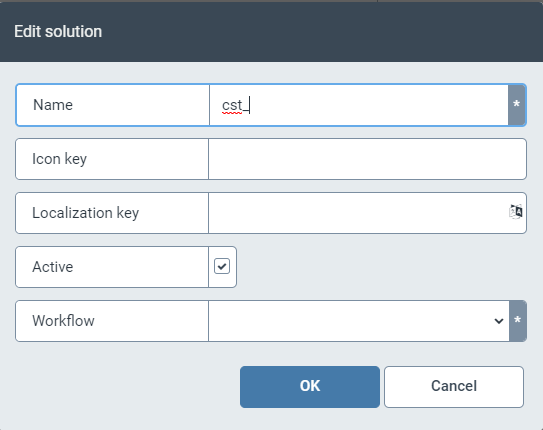
Make your specifications in the dialog box as follows:
Field
Instructions
Name
Enter the technical name of the solution.
Notice
The technical name comes prepended with cst_. This prefix cannot be deleted.
Icon key
Select the icon to represent the solution.
Store the icon in the primary screen Resources. For more information, see Creating a resource.
Localization key
Specify the localization key for the solution name to be displayed.
To open the Select localization dialog box, click the
 button.
For more information, see Selecting a localization.
Active
Check this box to activate the solution, or leave it unchecked to deactivate it.
Workflow
Using the drop-down list, select the workflow meant to be downstream from the solution.
Click OK to confirm the data you have entered and selected, or click Cancel to discard changes.
Editing a Solution (V1)
Notice
Solutions with the prefix sys_ cannot be edited.
If you wish to create an editable copy of a sys_, opent the solution and click the button Customize.
In the Solutions tab, select a solution with the prefix _cst by clicking on the line of the desired solution in the table.
Notice
The technical name comes prepended with cst_. This prefix cannot be deleted.
➣ The Edit solution dialog box will open.
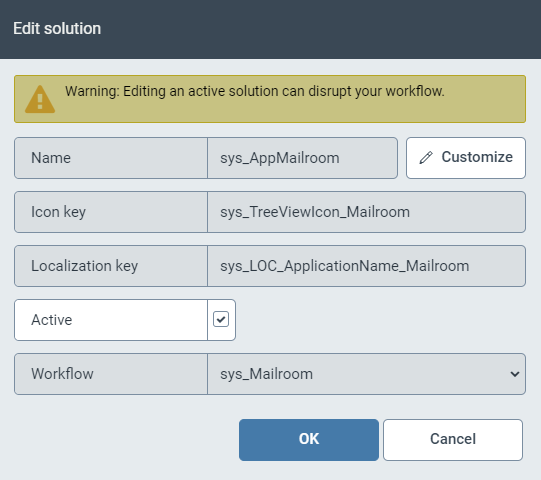
Deactivate the solution with the check box Active.
Edit the following fields as needed:
Field
Instructions
Name
Enter the technical name of the solution.
Icon key
Select the icon to represent the solution.
Store the icon in the primary screen Resources. For more information, see Creating a resource.
Localization key
Specify the localization key for the solution name to be displayed.
To open the Select localization dialog box, click the
button.For more information, see Selecting a localization.
Active
Check this box to activate the solution, or leave it unchecked to deactivate it.
Workflow
Using the drop-down list, select the workflow meant to be downstream from the solution.
Click OK to confirm the data you have entered and selected, or click Cancel to discard changes.