SAP Table Adapter
 |
Element | Field | Description |
|---|---|---|
System | Name | Specifies the name of the archive. |
Connection String | Specifies the connection string. | |
Router | Specifies the SAP router. | |
Data Source | Specifies the fully qualified server name of the SAP system. | |
System ID | Specifies the identification number of the SAP system. | |
System Number | Specifies the instance number of the SAP system. | |
Client | Specifies the client of the SAP system. | |
Language | Specifies the language abbreviation for the SAP system language, e.g. | |
Pool Size | Specifies the pool size. | |
Peak Connections Limit | Specifies the maximum number of simultaneous connections to the SAP system. | |
Idle Timeout Seconds | Specifies the number of seconds after which a connection to the SAP system is disconnected in the case of inactivity. | |
SNC Parameter | SNC Mode | Always |
SNC My Name | Specifies the name that was selected when generating the certificate locally on the server on which xSuite Bus Prism is installed.
| |
SNC Partner Name | Specifies the name of the certificate owner from the SAP system. Add the prefix Example: | |
SNC QOP | Always | |
SNC Library Path | Specifies the file path of the Crypto DLL file that is stored locally. | |
User | Name | Specifies the name of the login user. |
Password | Specifies the password of the login user. | |
Test Connection | Checks the connection to the SAP system. |
Setting up SNC connection for SAP adapters
Setting up SNC connection in SAP
Copy the SAP Crypto components provided –
sapcrypto.dllandsapgenpse.exe– to a separate directory on the server where xSuite Bus is installed.In this example:
c:\sap_cryptoCreate a directory for the certificates.
In this example:
c:\sap_cryptoCreate the environment variable (system) LD_LIBRARY_PATH. The content is the path to the SAP Crypto components.
In this example:
c:\sap_cryptoCreate the environment variable (system) SECUDIR. It will contain the path to the certificate directory.
In this example:
c:\sap_cryptoCreate a certificate on the server where xSuite Bus is installed. As administrator, open a command line in
c:\sap_cryptoand execute the following command:sapgenpse.exe gen_pse SAPSNCS.pse –s 4096 „CN=SNC_XFLOWBUS“Using the command line (administrators in
c:\sap_crypto), export the certificate for the SAP page:sapgenpse.exe export_own_cert –p SAPSNCS.pse >> c:\certificates \xFlowBus_cert.txtIn the SAP GUI, call the transaction STRUST.
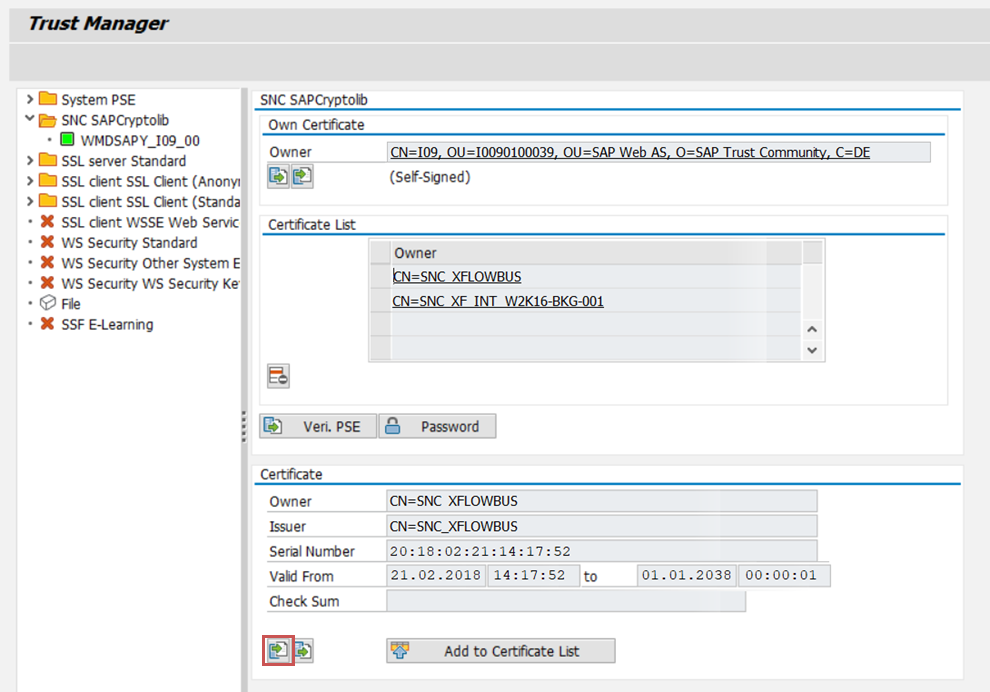
In the Certificate section, click the button
 Import Certificate and import the exported certificate.
In the Certificate section, click the button
 Add to Certificate List.
In the Own Certificate section, double-click the counterpart certificate in the Holder field and click the button
 Export Certificate.
Copy the exported counter certificate to the server where xSuite Bus is installed. Select the
c:\certificatesdirectory.Import the copied counter certificate via the command line (administrator in
c:\sap_crypto) to the server where xSuite Bus is installed:sapgenpse.exe maintain_pk –p SAPSNCS.pse –a c:\certificates\<CertificateName.cer>Enter the name of the cross-certificate from the ABAP server under
CertificateName.sapgenpse seclogin –p SAPSNCS.pse –O "wmd0\service_devThis is where the credentials are set up for the domain user
wmd0\service_dev.The user in this example is the one that runs the xSuite Bus services providing the xSuite Bus actions for communication with the SAP system.

In the SAP GUI, call the transaction SU01.
In the SNC tab, assign the SNC name to the SAP user that is set up in xSuite Bus at the SAP adapter. Add the prefix
p:to the name.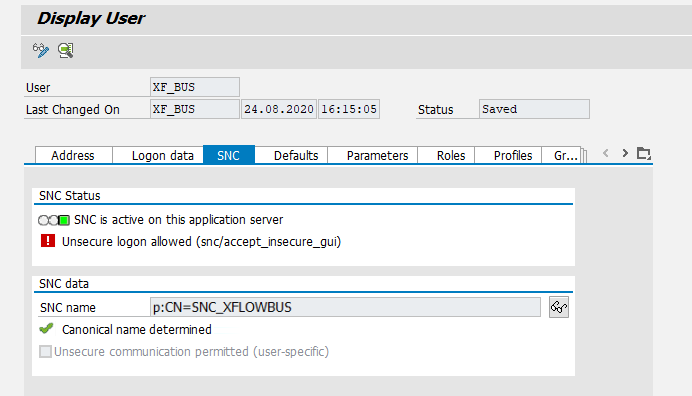
Setting up SNC connection in the xSuite Bus Management Studio
Notice
The xSuite Bus services on which the table mappings reside must be 64-bit services.
Use the 64-bit version of xSuite Bus Management Studio to set up the SNC connection.
Notice
The Windows user who starts the xSuite Bus Management Studio must have the same credentials as the domain user.
Open the 64-bit version of the xSuite Bus Management Studio from the directory
D:\xSuite\xSuiteBusPrism\bin64\XFlowHarmonyManagementStudio.exe.Go to Adapters → Table Adapters and click the entry
SAP_Production.Enter the following values in the SNC Parameters section:
Field
Value
SNC Mode
Name of the owner of the certificate from the SAP system (transaction STRUST → Field Owner).
Add the prefix
p:to the name.Example:
p:CN=I09, OU=I0090100039, OU=SAP Web AS, O=SAP TrustCommunity, C=DESNC Partner Name
Always
1SNC QOP
Always
3SNC Library Path
File path of the Crypto DLL file that is stored locally
To test the connection, click the button Test Connection and save.
Close the 64-bit version of xSuite Bus Management Studio.