Sales Document Monitor App
As of this release, the Sales Document Monitor from the SAP GUI (transaction /WMD/FP_SDM) is also available in the Fiori Launchpad as a separate xSuite App.
You must log on with a valid SAP user account. Users that only have xSuite Web accounts are not supported.
User exits on the back end
If user exits are available on the back end for the xSuite Sales Document Monitor, these user exits must be checked as to whether they work in conjunction with the xSuite App for SAP Fiori.
User exits may not, for instance, have any graphic SAP GUI elements such as dialogs, nor may they generate them when the user exit is executed via the application. Appropriate switches are required.
F4 value help
The F4 value help in the Sales Document Monitor App corresponds to the F4 value help in the Invoice Monitor App and differs accordingly from the F4 value help in the Workflow App and xSuite Web. Which functions are available depends on the data field for which the F4 input help is called and which data this field accepts (single value or several values/ranges, for example, in the search dialog).
Invalid values
If a value is entered that is recognized as incorrect even without verification by the back-end, the app will discard this value and display an error message.
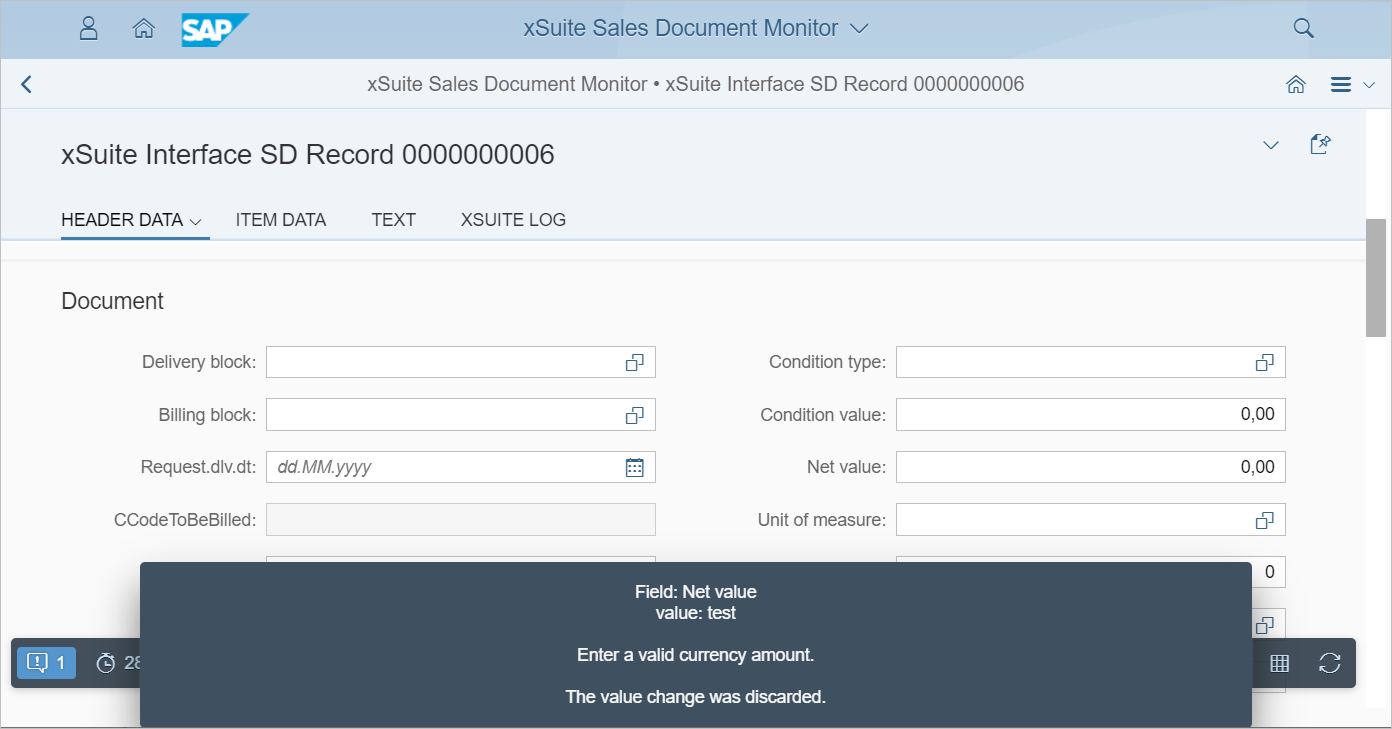
The error message will then automatically disappear.
Start page
When the application is started, a search dialog similar to that in the SAP GUI will be displayed.
Search fields
Fields are indicated as mandatory with a star (*). Empty mandatory fields are outlined in red.
In the field Interface Appl., only a single value can be entered. All other fields allow entry of multiple values with search operators such as "starts with" or "contains".
Depending on the data type of the search field and the length of the value entered, the search operators "contains" or "is equal to" are used for a value.
If two words are entered, they are treated as a unit. Example:
If you enter the words "John Nobody" in the field Scan user, exactly this string will be searched for.
If you want to search for two words that are independent of each other, you must use the F4 input help, because the search operator can only be changed there.
Dates can only be entered using the F4 input help. When you click in a date field, the F4 input help will open automatically.
Search criteria entered appears as a token. A token consists of the operator and the search value.

Each token may be deleted again with the X button. Tokens can only be changed in the F4 input help.
Footer toolbar
The buttons in the footer toolbar can be used to execute the following actions:
Button | Name | Description |
|---|---|---|
| Sorting | Specifies the order in which the data is delivered from the back-end. This is particularly relevant if more results are found than the maximum number that the back-end transmits to the front-end. |
| Create | Creates a new document. |
| Load variant | Loads a saved search variant. |
| Save variant | When you have entered search parameters, they are saved as a search variant. A new variant can be created or an existing one overwritten. Prerequisite: All mandatory fields are populated. |
| Clear search form | Empties the search form. |
| Search | Performs a search. Prerequisite: All mandatory fields are populated. |


Search results
Maximum number of found documents
The back end delivers a maximum of 500 documents as search results to the front end. If more than 500 documents have been found, a notification will appear in the table header.
The filter and sorting functions only apply to these 500 documents. It is therefore advisable to restrict the search so that a maximum of 500 documents are found.
Opening a document
To open a document, click the  Show document button in the second column of the table.
Table toolbar
The table toolbar has buttons for the following actions:
Button | Name | Description |
|---|---|---|
| Create | Creates a new document. |
| Reactivate | Reactivates a document. A suitable document must be selected. |
| Cancel data extraction | Aborts the data-extraction process. A minimum of one suitable document must be selected. |
| Resubmission | Sets or removes resubmission. A minimum of one suitable document must be selected. |
| Mass deletion | Deletes documents. A minimum of one suitable document must be selected. |
| Total | Executes a calculation such as a sum or an average.
|
| Filter | Sets a filter. In the search results available, you can use filters to drill further down. |
| Clear all filters | Removes all filters set. |
| Sorting | Sorts or categorizes search results. Multiple columns can be selected and the type of sorting — ascending or descending — determined. If the responsive table is used, you can set how results are to be subdivided. |
| Restore default sorting | Removes the sorting/subdivision set. |
| Settings | Determines settings for the search results. For more information, see User-specific settings for search results. |


Footer toolbar
The footer toolbar contains the following actions.
Button | Name | Description |
|---|---|---|
| Show search criteria | Displays the Sales Document Monitor search form. The search form is filled with the search parameters that have resulted in the search results. |
| Refresh | Executes the search again. |


User-specific settings for search results
A user can make the following settings for his search results:
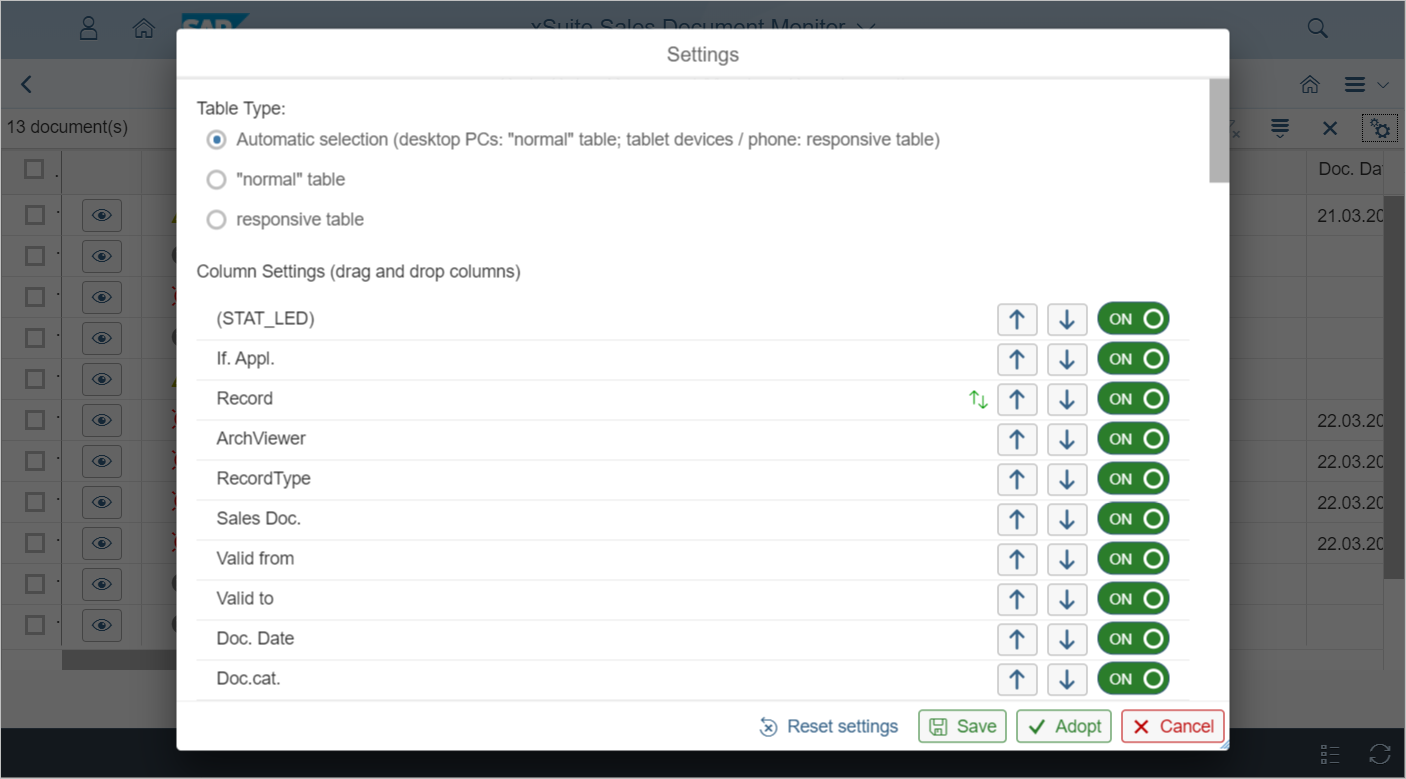
This is where to make settings for the type of table used to display search results.
The following options are available:
Automatic selection: On tablets and smartphones, the responsive table is automatically used. On desktop PCs and laptops, the "normal" table is automatically used.
"Normal" table: In the normal tables, all columns are displayed side by side. If the table contains a large number of columns, the table will become so wide that horizontal scrolling will be necessary.
Responsive table: In the responsive tables, the number of columns displayed is limited to the space available on the screen. All columns that do not fit are displayed as rows. This way, all information can be scrolled through vertically.
This setting is practical for mobile end devices. However, on large monitors, a large amount of space is lost due to empty areas.
Here, all columns / data fields are presented that can be output in the search results.
The order of the columns can be changed by drag-and-drop or with the arrow buttons.
Use the on/off button to set whether a column is to be shown. The following applies:
A maximum of 30 columns can be displayed simultaneously. If 30 columns are set, the rest of the off-buttons will be disabled.
If columns with amounts — net amount or tax amount, for instance — are displayed, then the columns Credit/Debit and Currency will be turned on. These two columns can only be turned off if all amount columns have already been turned off.
Changed settings can be adopted permanently or temporarily with the following buttons:
Save
This saves the settings permanently on the back end. They are then used at the next log-in.
Adopt
This does not save the settings on the back end but only temporarily on the front end. The settings only apply to the current session. The settings last saved in the back end will be used at the next log-in.
Documents
Cache
For performance reasons, a cache is used in the Sales Document Monitor App. The functionality is identical to that of the cache in the Invoice Monitor App.
Data validation
Along with the front-end data validation described above, the header and line-item data is sent to the back end for validation as soon as it has been entered. Invalid data is discarded directly.
Footer toolbar
A toolbar is located on the left side of the validation screen in the SAP GUI. These buttons are displayed in the Sales Document Monitor App in the footer toolbar.
The following buttons are not available here:
Enter (SAP)
Create customer
Display document
Attachments
If monitors of desktop PCs or laptops are particularly large, the browser screen will be divided to accommodate the display of attachment(s). Then the data is displayed on the left side and the attachments on the right.
On small browser screens, there will be two pages between which you can toggle, using the navigation at the lower edge of the screen. The first page contains the data, the second the attachments.
If an order document has been extracted from xFlow Bus 2.1 or higher, it will be displayed in DocViewer. The prerequisite for this is that the DocViewer has been set up. For more information, see Setting up the DocViewer.
In the DocViewer, you can use highlighting. To activate/deactivate highlighting, use the button located in the document header.
If a user clicks in a data field on the left side of the screen when highlighting is activated, the respective value will be highlighted in the attachment. A prerequisite for this is that a field mapping is configured for the data field (/WMD/BC_SPRO → xSuite Business Solutions → Interface → Assign Fields) and that the information belonging to the data field has been extracted in the order document.
Attached PDF files are displayed directly in the browser if a browser plug-in is installed for it.
To open any other file format, the file in question must be downloaded.
On mobile end devices such as tablets and smartphones, external display is always activated. On desktop PCs and laptops, external display can be activated as an alternative.
When external display is used, attachments are opened in a separate browser window.
Setting up the DocViewer
In order to use DocViewer within the Fiori Launchpad, a cross-origin request to the xSuite Capture server must be enabled. This requires settings to the Internet Information Services (IIS) on the xSuite Capture Server.
Install the IIS CORS module on the xSuite Capture server. Download under:
https://www.iis.net/downloads/microsoft/iis-cors-moduleNote
For more information on the IIS CORS module, see https://blogs.iis.net/iisteam/getting-started-with-the-iis-cors-module.
Open the
Web.configfile of xFlow Bus in the following folder for editing:C:\Program Files (x86)\WMD\xFlowBusWeb\xFlowBusWebServiceHost\Web.configInsert the code section
corsat the following position: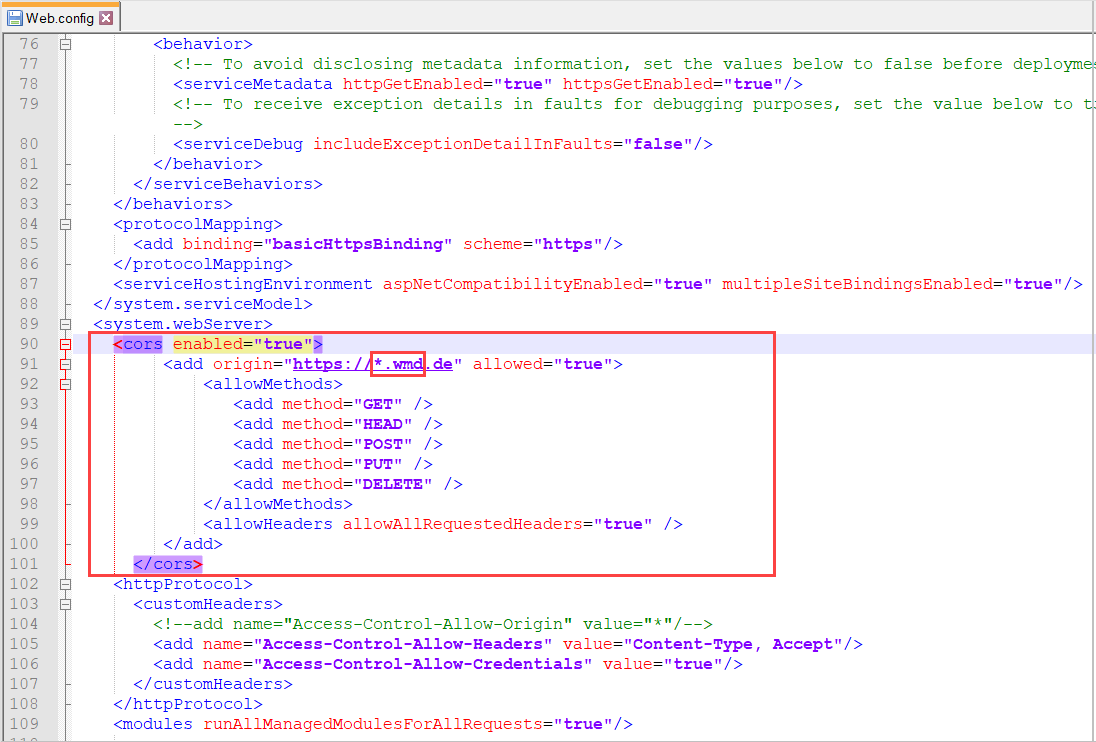
<cors enabled="true">
	<add origin="https://*.wmd.de" allowed="true">
		<allowMethods>
			<add method="GET" />
			<add method="HEAD" />
			<add method="POST" />
			<add method="PUT" />
			<add method="DELETE" />
		</allowMethods>
		<allowHeaders allowAllRequestedHeaders="true" />
	</add>
</cors>
In the code section
cors, replace the entry*.wmd.dewith the domain of the gateway server.Restart the IIS.